

Android Automation Support
Midscene can drive adb tools to support Android automation.
By adapting a visual model solution, the automation process works with any app tech stack—whether built with Native, Flutter, React Native, or Lynx. Developers only need to focus on the final experience when debugging UI automation scripts.
The Android UI automation solution comes with all the features of Midscene:
- Supports zero-code trial using Playground.
- Supports JavaScript SDK.
- Supports automation scripts in YAML format and command-line tools.
- Supports HTML reports to replay all operation paths.
Showcases
Prompt : Open the Booking App, search for a hotel in Tokyo for four adults on Christmas, with a score of 8 or above.
View the full report of this task: report.html
See more showcases: showcases
This guide walks you through everything required to automate an Android device with Midscene: connect a real phone over adb, configure model credentials, try the no-code Playground, and run your first JavaScript script.
Control Android devices with JavaScript: https://github.com/web-infra-dev/midscene-example/blob/main/android/javascript-sdk-demo
Integrate Vitest for testing: https://github.com/web-infra-dev/midscene-example/tree/main/android/vitest-demo
Set up API keys for model
Set your model configs into the environment variables. You may refer to Model strategy for more details.
For more configuration details, please refer to Model strategy and Model configuration.
Prepare your Android device
Before scripting, confirm adb can talk to your device and the device trusts your machine.
Install adb and set ANDROID_HOME
- Install via Android Studio or the command-line tools
- Verify installation:
Example output indicates success:
- Set
ANDROID_HOMEas documented in Android environment variables, then confirm:
Any non-empty output means it is configured:
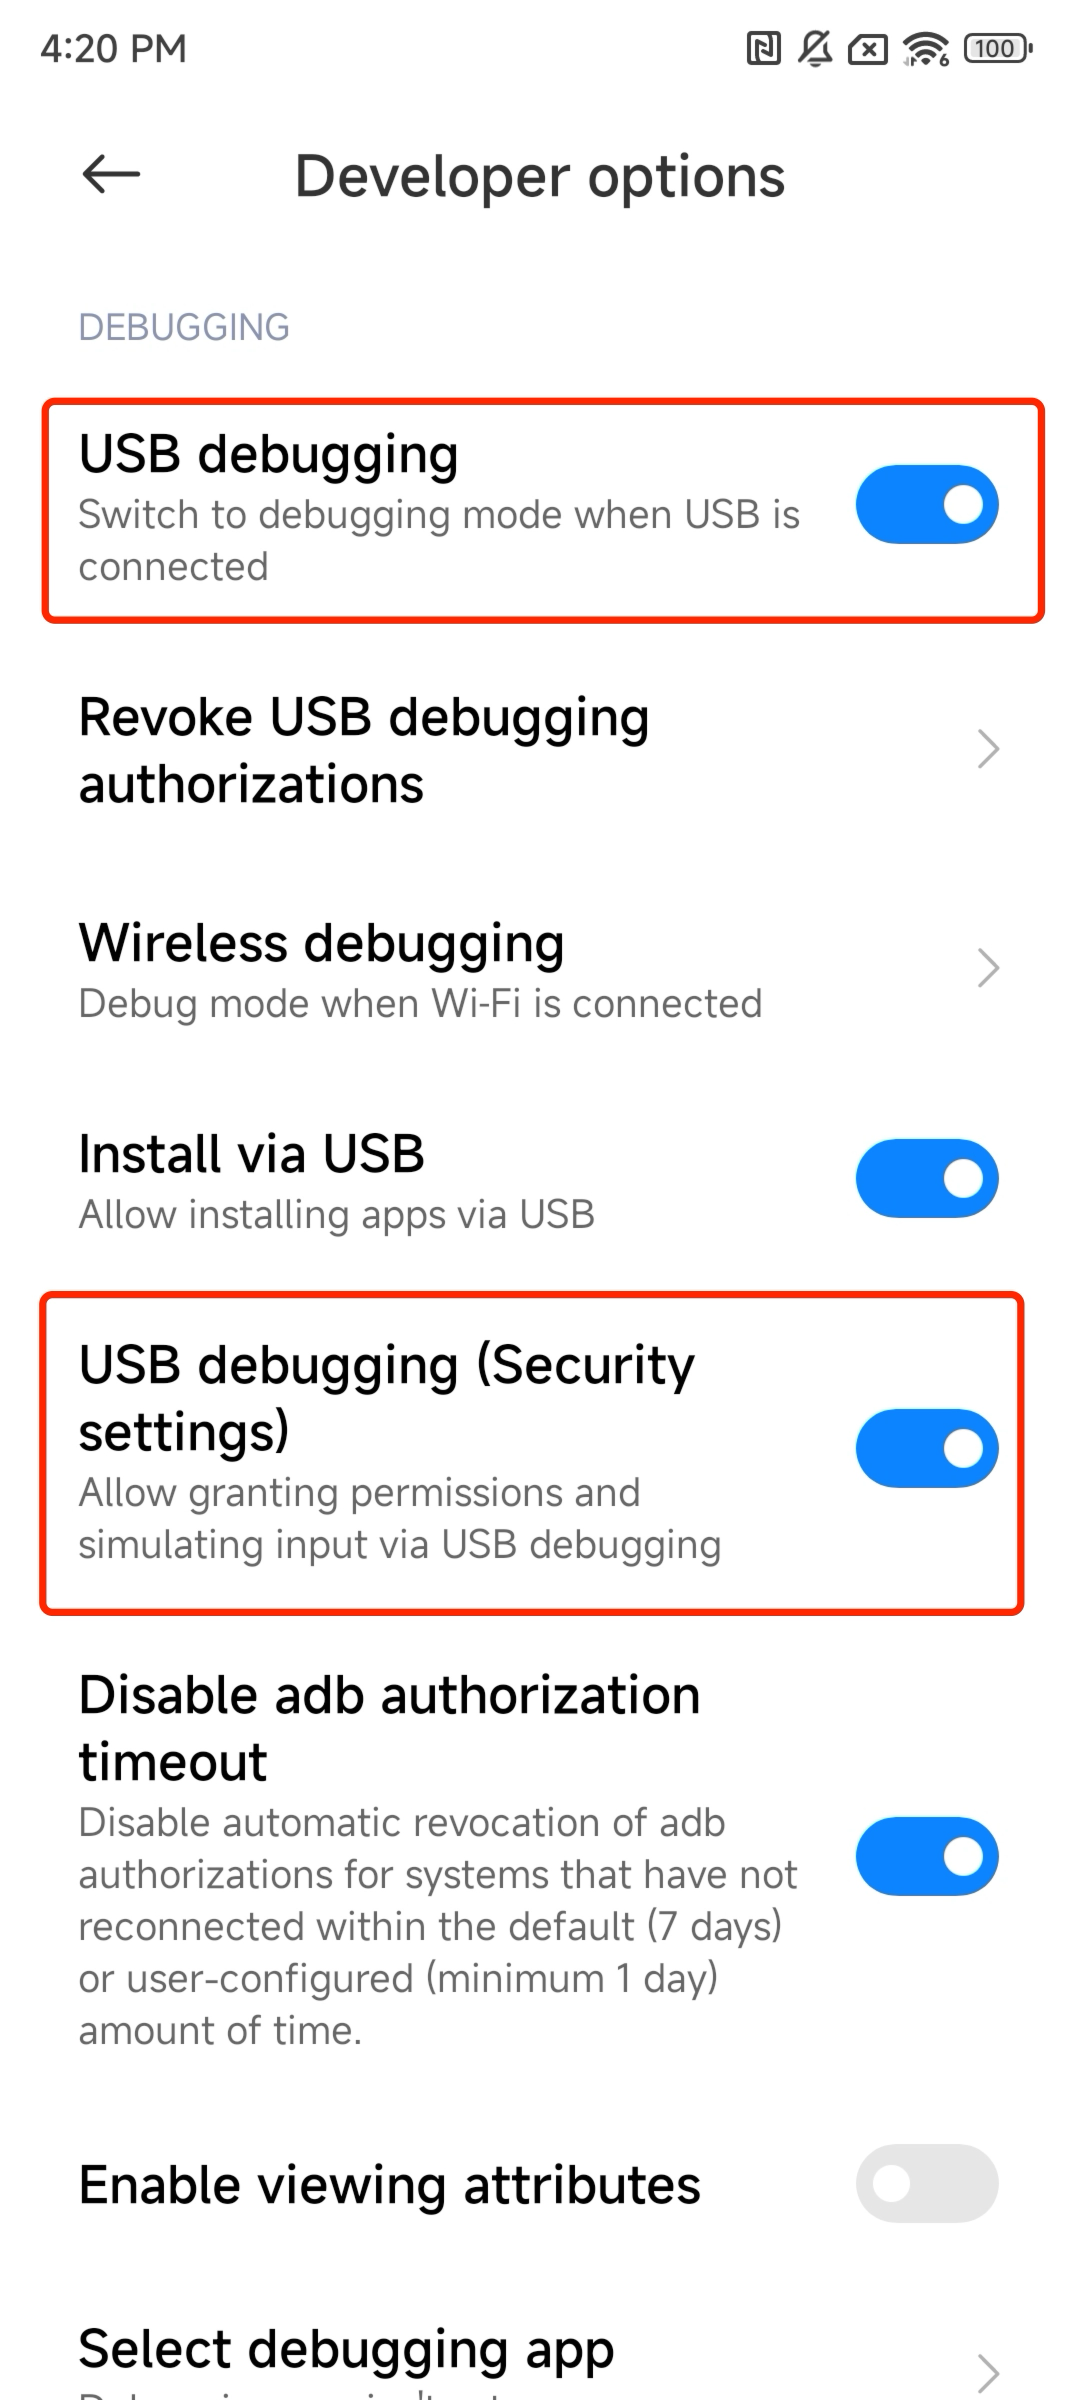
Enable USB debugging and verify the device
In the system settings developer options, enable USB debugging (and USB debugging (Security settings) if present), then connect the device via USB.
Verify the connection:
Example success output:
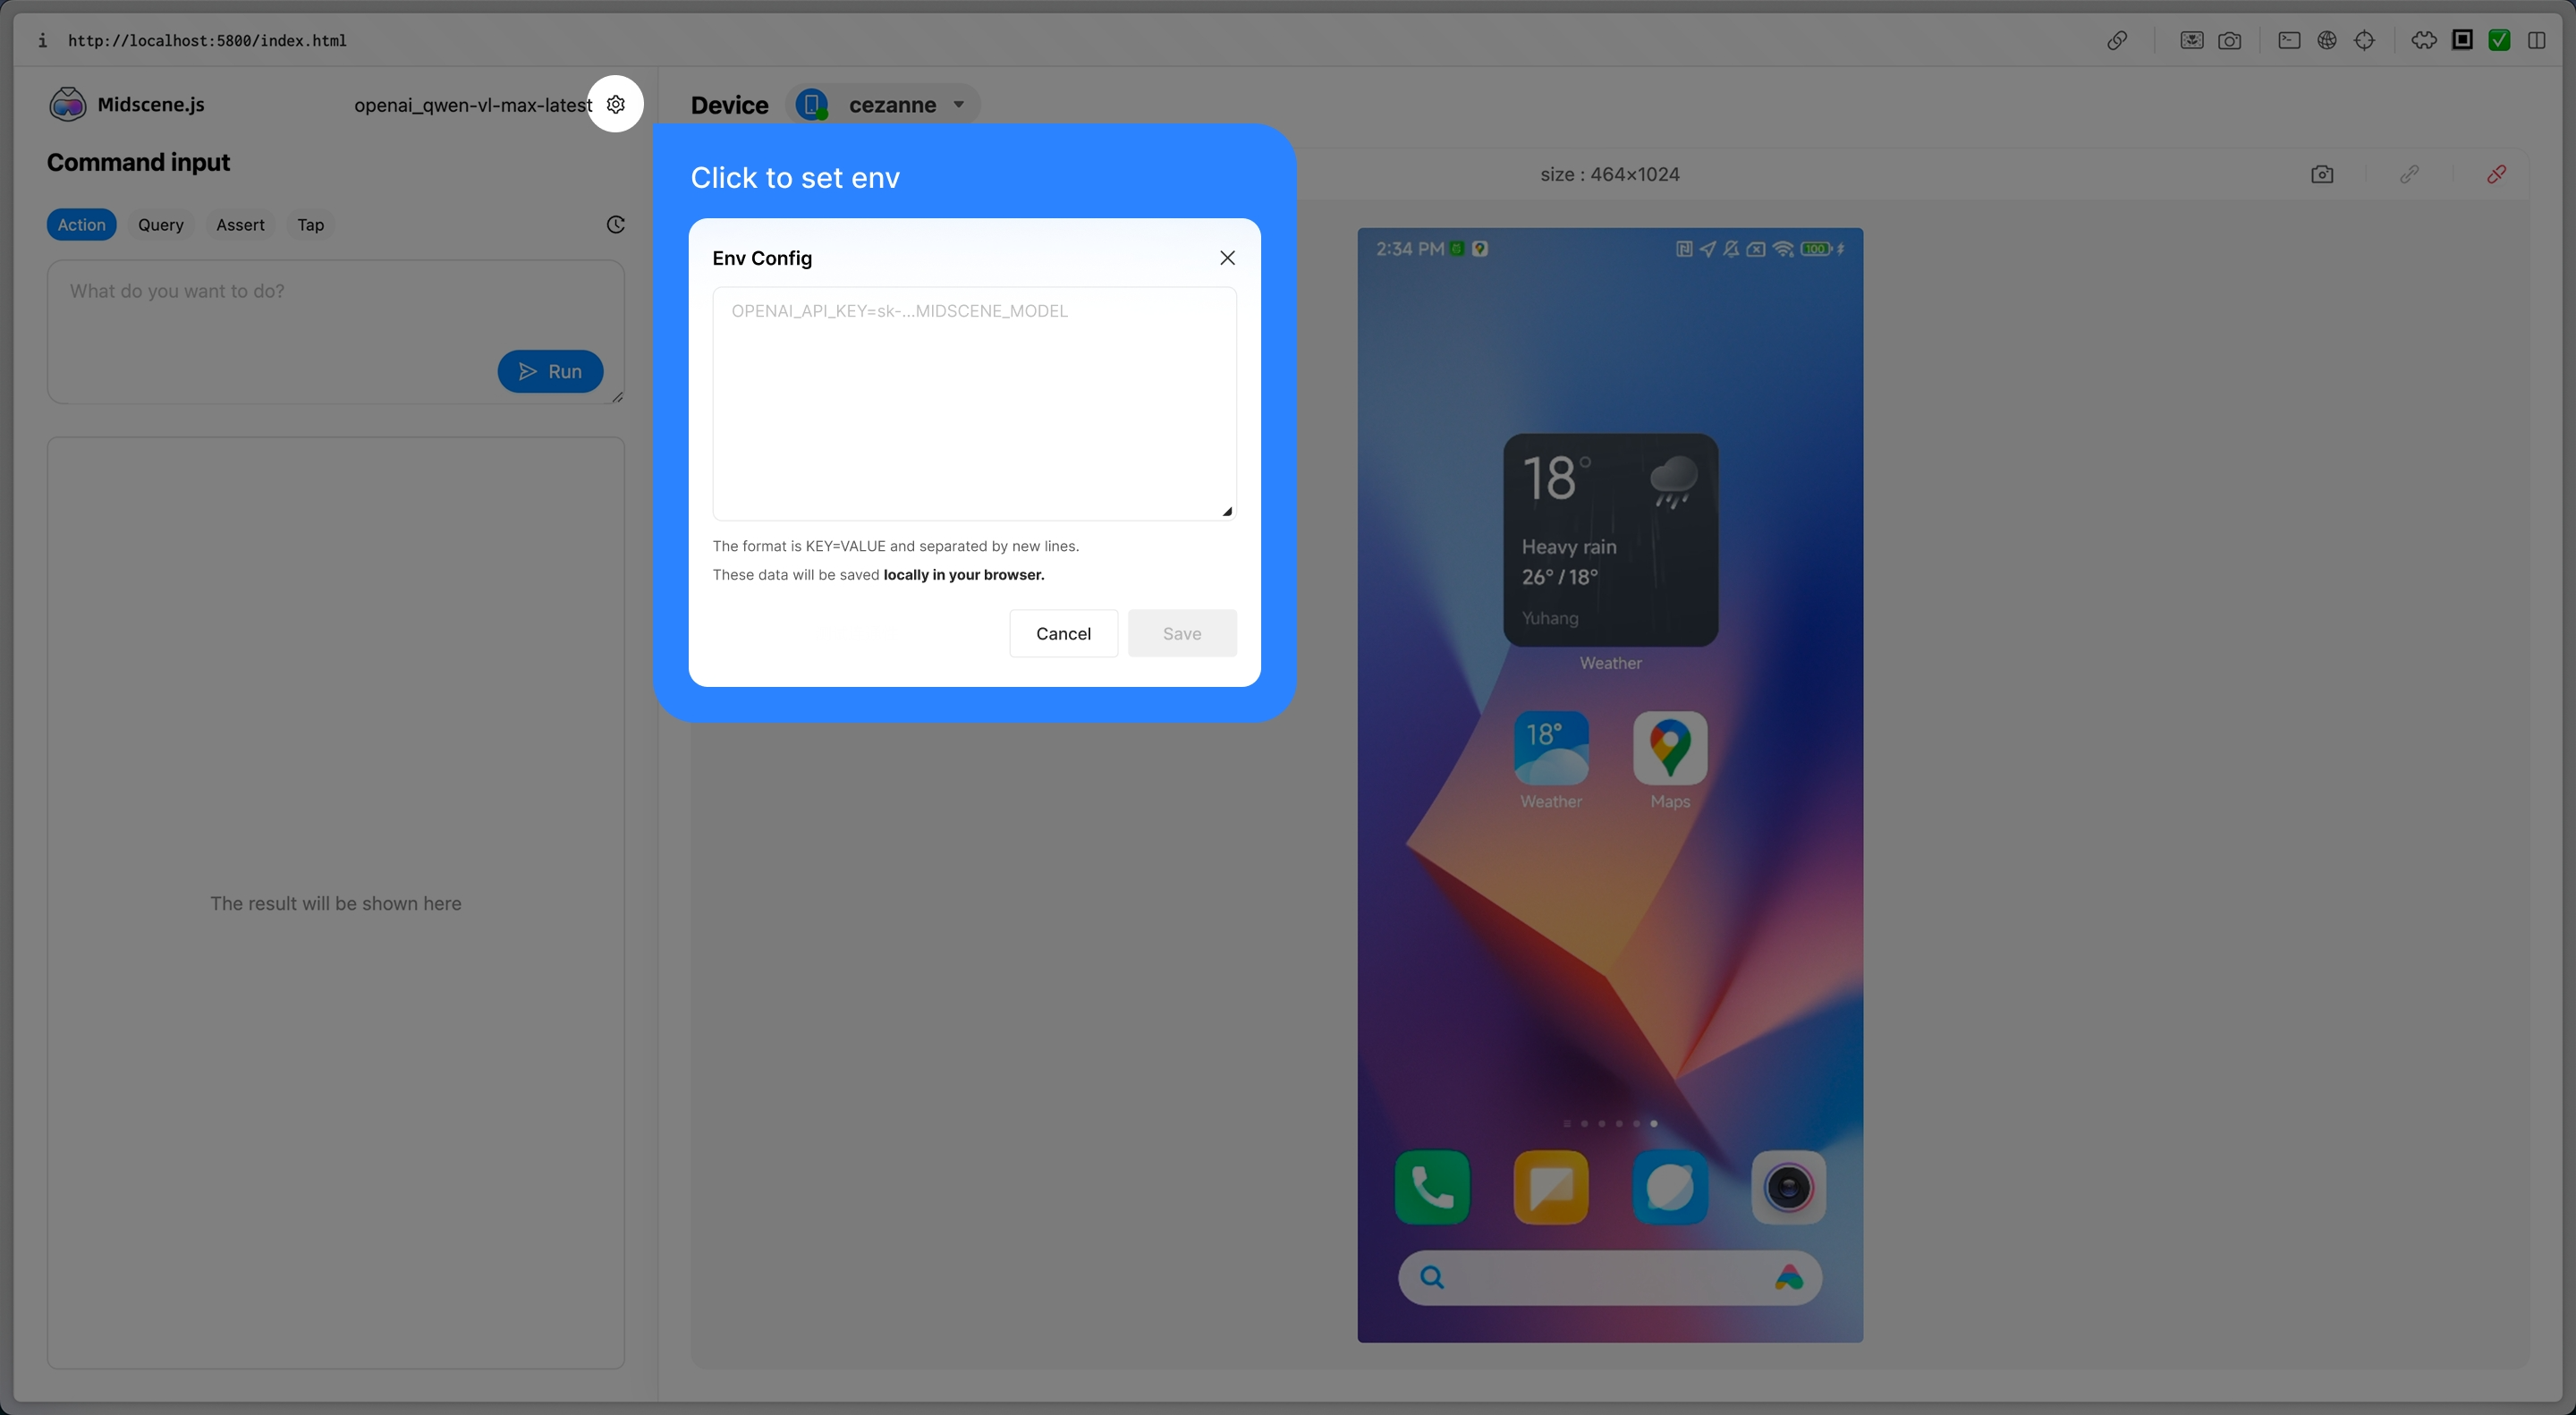
Try Playground (no code)
Playground is the fastest way to validate the connection and observe AI-driven steps without writing code. It shares the same core as @midscene/android, so anything that works here will behave the same once scripted.
- Launch the Playground CLI:
- Click the gear icon in the Playground window, then paste your API key configuration. Refer back to Model configuration if you still need credentials.
Start experiencing
After configuration, you can start using Midscene right away. It provides several key operation tabs:
- Act: interact with the page. This is Auto Planning, corresponding to
aiAct. For example:
- Query: extract JSON data from the interface, corresponding to
aiQuery.
Similar methods include aiBoolean(), aiNumber(), and aiString() for directly extracting booleans, numbers, and strings.
- Assert: understand the page and assert; if the condition is not met, throw an error, corresponding to
aiAssert.
- Tap: click on an element. This is Instant Action, corresponding to
aiTap.
For the difference between Auto Planning and Instant Action, see the API document.
Integration with Midscene Agent
Once Playground works, move to a repeatable script with the JavaScript SDK.
Step 1. Install dependencies
Step 2. Write scripts
Save the following code as ./demo.ts. It opens the browser on the device, searches eBay, and asserts the result list.
Step 3. Run
Step 4: View the report
Successful runs print Midscene - report file updated: /path/to/report/some_id.html. Open the generated HTML file in a browser to replay every interaction, query, and assertion.
Advanced
Use this section when you need to customize device behavior, wire Midscene into your framework, or troubleshoot adb issues. For detailed constructor parameters, jump to the API reference(Android).
Extend Midscene on Android
Use defineAction() for custom gestures and pass them through customActions. Midscene will append them to the planner so AI can call your domain-specific action names.
See Integrate with any interface for a deeper explanation of custom actions and action schemas.
More
- For every Agent method, check the API reference (Common).
- For the Android API reference, see Android Agent API.
- Demo projects
- Android JavaScript SDK demo: https://github.com/web-infra-dev/midscene-example/blob/main/android/javascript-sdk-demo
- Android + Vitest demo: https://github.com/web-infra-dev/midscene-example/tree/main/android/vitest-demo
Complete example (Vitest + AndroidAgent)
Merged reports are stored inside midscene_run/report by default. Override the directory with MIDSCENE_RUN_DIR when running in CI.
FAQ
Why can't I control the device even though I've connected it?
A common error is:
Make sure USB debugging is enabled and the device is unlocked in developer options.
Text input is cleared or lost after typing
After entering text, Midscene automatically dismisses the keyboard. The default behavior sends an ESC key event. However, some input fields (especially those inside WebView) listen for the ESC key event, which can cause side effects such as:
- Clearing the text just entered
- Closing the popup/modal containing the input field
- Navigating away from the current page
You can try the following solutions in order of priority:
Option 1: Use the BACK key (Android back button) to dismiss the keyboard
Set keyboardDismissStrategy to 'back-first' to use the Android BACK key instead of ESC to dismiss the keyboard:
Option 2: Disable auto keyboard dismiss
If your input field also listens for the BACK key, you can disable auto keyboard dismiss entirely and let the AI Agent or subsequent actions manage the keyboard state:
With auto dismiss disabled, the keyboard will remain visible and may cover a large portion of the screen. You can work around this by:
- Using
aiActto manually dismiss the keyboard, e.g.await agent.aiAct('tap the collapse button on the keyboard') - Installing and switching to ADBKeyBoard — a minimal virtual keyboard that takes up very little screen space, so it barely affects screen interactions even when visible
English text is rewritten by the Android keyboard
If the report shows the correct input parameter, but the app receives different text, missing text, or Chinese/pinyin candidates, the active Android input method may be rewriting the text. This can happen when pure ASCII text goes through the native adb input text path while a Chinese keyboard or autocorrect keyboard is active.
Use the existing imeStrategy option and force all text input through yadb:
For YAML scripts:
Or set the environment variable:
This is different from text being cleared after typing. If the text is entered correctly and then disappears, check keyboardDismissStrategy or autoDismissKeyboard instead.
How do I use a custom adb path or remote adb server?
Set the environment variables first:
You can also provide the same information via the constructor:
API reference
Use this doc when you need to customize Midscene's Android automation or review Android-only constructor options. For shared parameters (reporting, hooks, caching, etc.), see the platform-agnostic API reference (Common).
Action Space
AndroidDevice uses the following action space; the Midscene Agent can use these actions while planning tasks:
Tap— Tap an element.DoubleClick— Double-tap an element.Input— Enter text withreplace/typeOnly/clearmodes (appendis a deprecated alias fortypeOnly). Supports optionalautoDismissKeyboardparameter.Scroll— Scroll from an element or screen center in any direction, with helpers to reach the top, bottom, left, or right.DragAndDrop— Drag from one element to another.KeyboardPress— Press a specified key.LongPress— Long-press a target element with optional duration.PullGesture— Pull up or down (e.g., to refresh) with optional distance and duration.Pinch— Two-finger pinch gesture. Usescale > 1to zoom in,scale < 1to zoom out.ClearInput— Clear the contents of an input field.Launch— Open a web URL orpackage/.Activitystring.Terminate— Force-stop an app by package name.RunAdbShell— Execute rawadb shellcommands.AndroidBackButton— Trigger the system back action.AndroidHomeButton— Return to the home screen.AndroidRecentAppsButton— Open the multitasking/recent apps view.
AndroidDevice
Create a connection to an adb-managed device that an AndroidAgent can drive.
Import
Constructor
Device options
deviceId: string— Value returned byadb devicesorgetConnectedDevices().autoDismissKeyboard?: boolean— Automatically hide the keyboard after input. Defaulttrue.keyboardDismissStrategy?: 'esc-first' | 'back-first'— Order for dismissing keyboards. Default'esc-first'.androidAdbPath?: string— Custom path to the adb executable.remoteAdbHost?: string/remoteAdbPort?: number— Point to a remote adb server.imeStrategy?: 'always-yadb' | 'yadb-for-non-ascii'— Choose when to invoke yadb for text input. Default'yadb-for-non-ascii'.'yadb-for-non-ascii'(default) — Uses yadb for Unicode characters (including Latin Unicode like ö, é, ñ), Chinese, Japanese, and format specifiers (like %s, %d). Pure ASCII text uses the faster nativeadb input text.'always-yadb'— Always uses yadb for all text input, providing maximum compatibility but slightly slower for pure ASCII text.
displayId?: number— Target a specific virtual display if the device mirrors multiple displays.screenshotResizeScale?: number— Deprecated. This option has been removed and no longer has any effect. UsescreenshotShrinkFactorinAgentOptinstead to control screenshot size sent to the AI model.minScreenshotBufferSize?: number— Screenshot buffer size validation threshold in bytes. Buffers below this value are treated as failed or corrupted captures. Default1024(1KB). Set to0to skip only this size check; Midscene still rejects empty buffers and invalid image formats.alwaysRefreshScreenInfo?: boolean— Re-query rotation and screen size every step. Defaultfalse.scrcpyConfig?: object— Scrcpy high-performance screenshot configuration, disabled by default. See Scrcpy Screenshot Mode below.
Scrcpy Screenshot Mode
By default, Midscene captures screenshots via adb shell screencap, which takes ~500–2000ms per call. Enabling Scrcpy mode streams H.264 video from the device and captures frames in real time, reducing screenshot latency to approximately 100–200ms.
How to enable:
Optional parameters:
Scrcpy mode automatically falls back to ADB screenshots if the connection fails. No extra error handling is needed.
Usage notes
- Discover devices with
getConnectedDevices(); theudidmatchesadb devices. - Supports remote adb via
remoteAdbHost/remoteAdbPort; setandroidAdbPathif adb is not on PATH. - Use
screenshotShrinkFactorinAgentOptto cut latency on high-DPI devices.
Examples
Quick start
Launch native packages
AndroidAgent
Wire Midscene's AI planner to an AndroidDevice for UI automation.
Import
Constructor
Android-specific options
customActions?: DeviceAction[]— Extend planning with actions defined viadefineAction.appNameMapping?: Record<string, string>— Map friendly app names to package names. When you pass an app name tolaunch(target), the agent will look up the package name in this mapping. If no mapping is found, it will attempt to launchtargetas-is. User-provided mappings take precedence over default mappings.- All other fields match API constructors:
generateReport,reportFileName,aiActionContext,modelConfig,cacheId,createOpenAIClient,onTaskStartTip, and more.
Usage notes
- Use one agent per device connection.
- Android-only helpers such as
launch,terminate, andrunAdbShellare also exposed in YAML scripts. See Android platform-specific actions. - For shared interaction methods, see API reference (Common).
Android-specific methods
agent.launch()
Launch a web URL or native Android activity/package.
target: string— Can be a web URL, a string inpackage/.Activityformat (e.g.,com.android.settings/.Settings), an app package name, or an app name. If you pass an app name and it exists inappNameMapping, it will be automatically resolved to the mapped package name; otherwise,targetwill be launched as-is.
agent.runAdbShell()
Run a raw adb shell command through the connected device. Pass only the shell command itself, without the adb shell prefix.
command: string— Command passed verbatim toadb shell. For example, useinput tap 100 200, notadb shell input tap 100 200.opt.timeout?: number— Optional command execution timeout in milliseconds.
agent.terminate()
Terminate (force-stop) a running Android app.
uri: string— Package name, app name inappNameMapping, orpackage/.Activity(only the package part is used).
Navigation helpers
agent.back(): Promise<void>— Trigger the Android system Back action.agent.home(): Promise<void>— Return to the launcher.agent.recentApps(): Promise<void>— Open the Recents/Overview screen.
Helper utilities
agentFromAdbDevice()
Create an AndroidAgent from any connected adb device.
deviceId?: string— Connect to a specific device; omitted means “first available”.opts?: PageAgentOpt & AndroidDeviceOpt— Combine agent options with AndroidDevice settings.
getConnectedDevices()
Enumerate adb devices Midscene can drive.